When you think of your next idea, you’re probably eager to see your product land in customers’ hands as quickly as possible. We’d like to help you get there. So, we’re sharing our successful, six-step gameplan that will guide you all the way from your first brainstorm to the marketplace.
Just so you know where we’re coming from, FATHOM speeds up the entire product development process with new, faster technologies like 3D printing and hybridized manufacturing. With our experience supporting Silicon Valley companies and scrappy startups, we can help nearly any company move from their initial prototype into production.
Here’s our advice to help you work quicker on your own:
1. Roadmap your project

First, define a problem—and how you plan to solve it with your product.
The next step might seem like busywork, but it’s a critical one (someday, you’ll be glad you did it). Define the user experience, and study your target market from many angles:
- How do people currently solve this problem?
- What options do potential users have today?
- Are there problems caused by current solutions?
- How will our product create a better experience?
- What are the necessary target profit margins we need to generate?
- What range for cost of goods sold (COGS, or how much it costs to produce the product) are we shooting for?
By answering these questions, you can map out the current market landscape—and begin to understand the future playing field. That way, you can match your goals and timelines with the constraints of the marketplace. Use this opportunity to make a solid MRD (Marketing Requirements Document). With this first draft, you can aim for your ideal pricing from the get-go.
2. Explore design possibilities

Narrow in on your product’s features and how it will look. Divide your features into “need-to-have” and “nice-to-have.” Later on, this exercise will help you control “feature creep”—continually adding on new features in a product. A common nail in the coffin of many projects, feature creep can stall your development process with too many unnecessary distractions.
Your MRD is a good reference point. See how close you can get to your goal with current technology. Create rough models of your product in 2D and 3D. At the end of this design exploration, you will have a “gap analysis” that defines the engineering challenge and the boundaries of your work.
3. Decide on the design

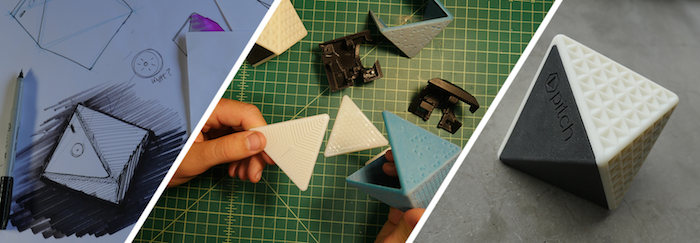
In this phase, solidify your ideas into a product. After starting wide in concepts, brainstorming solutions, combining ideas, and weeding out problems, this is the phase where you put a hold on some less important ideas for a later version of your product. Use 3D printing to build out models at a low cost. This could also get potential backers interested in your idea and help make some pre-sales before you launch. This is a major advantage of modern 3D printing and rapid prototyping services: you can create a near-finished product before investing in full-scale production.
At the end of this phase, you should walk away with some renderings of the product, some polished models, and a finalized MRD. You should also have an initial PRD (Product Requirements Document), which outlines the product’s engineering features. Lastly, you’ll also have a working bill of materials (BOM) with a rough idea of your product’s pricing.
You now have all the tools in place to tell your complete story and get funding!
4. Build systems for your supplies

Build models to define your product’s many parts and functions. Then find a supplier for your key components to make sure the items are available and compatible with your design. Be sure to finalize most of your decisions about what to make and buy.
While you’re still working on industrial design, come up with rough ideas for your packaging—not the cardboard box, but the outer shell of your design itself. Outline all the major functions of your product. Make 3D prints of each part to verify fit, form and function. Now you’re ready to revisit your industrial design goals to see where some compromise needs to happen. Try to work backwards and find places where you can reduce cost. Get parts quotes, talk with suppliers, and update the bill of materials.
5. Refine your design for production

In the next exciting stage, you finally get to test working prototypes. Be sure to consult experts in design for manufacturing (DFM). Develop a plan before using 3D printing. Then, you’ll be able to assemble a fully functional prototype. Finally, update the bill of materials again to make sure your pricing is accurate.
6. Sync all of your business tools

You’re almost there! Now it’s time to refine your design. You should have a fully functional working unit that reflects your original design goals, with all of the functions in the package. Get your files ready. Build extensive models to confirm that everything works. You will need to source sample parts for test builds.
Then, lock down your supply chain and figure out how you’ll distribute your product. Build models that look and act just like product. Lastly, finalize your bill of materials and pricing projections.
Good news: This is when major investors and backers start to take you seriously! Now you are in a solid place to launch your crowdfunding campaign and raise the money you need to start the business of your dreams.
Start a conversation with FATHOM about prototypes and production parts for your Indiegogo campaign!
Looking for more information on design-for-manufacturing? Ask the experts!